Raspberry Pi Debug Probe: a plug-and-play debug kit for $12 [Raspberry]
Raspberry Pi Foundation から Raspberry Pi Debug Probe が出ました。
Raspberry Pi Debug Probe のニュース発表はこちら。
Raspberry Pi Debug Probe の商品説明はこちら。
説明によると、接続はこのようになります。

Raspberry Pi Debug Probe documentation によると、使うには OpenOCD(On-Chip Debugger)と GDB のインストールが必要です。
なので、Windows よりも Linux や MacOS の方が親和性が高いと思います。
特に、Linux なら Raspberry Pi から使えます。
説明には
Linux (and Raspberry Pi)
On Raspberry Pi OS you can install openocd directly from the command line.
$ sudo apt install openocd
You need to be running OpenOCD version 0.11.0 or 0.12.0 to have support for the Debug Probe.
とあります。
GDB から Raspberry Pi Pico をデバッグできるのは便利そうです。
外観はこんな感じです。
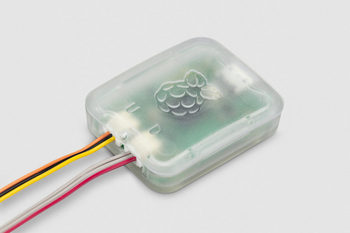
付属品です。
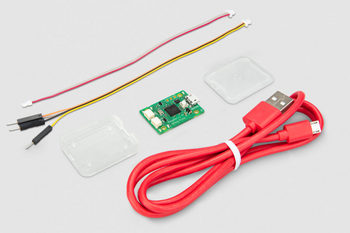
Raspberry Pi Debug Probe のニュース発表はこちら。
Raspberry Pi Debug Probe の商品説明はこちら。
説明によると、接続はこのようになります。

Raspberry Pi Debug Probe documentation によると、使うには OpenOCD(On-Chip Debugger)と GDB のインストールが必要です。
なので、Windows よりも Linux や MacOS の方が親和性が高いと思います。
特に、Linux なら Raspberry Pi から使えます。
説明には
Linux (and Raspberry Pi)
On Raspberry Pi OS you can install openocd directly from the command line.
$ sudo apt install openocd
You need to be running OpenOCD version 0.11.0 or 0.12.0 to have support for the Debug Probe.
とあります。
GDB から Raspberry Pi Pico をデバッグできるのは便利そうです。
外観はこんな感じです。

付属品です。

APRS ビーコンを出してみた(南アルプス 入笠山 編、山岳回折) [APRS]
今日は、南アルプス 前衛の入笠山をゴンドラを使って、途中を時短し、スノーシューで歩いてきました。
その間の APRS ビーコンの状況です。なお、ビーコンは 144MHz で出しています。

aprs.fi での地図表示
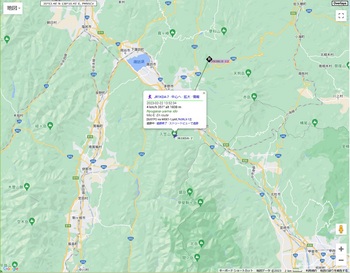
電波を直接受信していただいたのは、7N3RLX-12 局と JN1JTN-2 局の2局でした。
特に、JN1JTN-2 局は前橋市の局です。長野県から良く届いたなとビックリです。
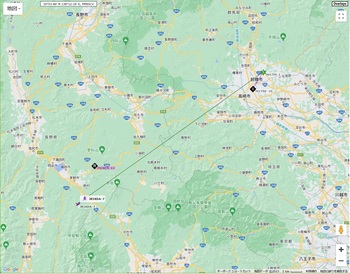
山岳回折が起きたようです。
山岳回折はこちらを。
その間の APRS ビーコンの状況です。なお、ビーコンは 144MHz で出しています。
aprs.fi での地図表示

電波を直接受信していただいたのは、7N3RLX-12 局と JN1JTN-2 局の2局でした。
特に、JN1JTN-2 局は前橋市の局です。長野県から良く届いたなとビックリです。

山岳回折が起きたようです。
山岳回折はこちらを。
今度は ChatGPT に DDS の Verilog コードを聞いてみた [Other]
今度は DDS の Verilog コードを聞いて見ました。
質問はこれです。
Please tell me about Verilog DDS source code.
帰ってきた結果です。
module dds(clk, rst, en, sine, cosine);
input clk, rst, en;
output [15:0] sine, cosine;
reg [15:0] sine, cosine;
reg [15:0] phase;
always @(posedge clk) begin
if (rst) begin
phase <= 0;
end else if (en) begin
phase <= phase + 1;
end
end
always @(posedge clk) begin
if (rst) begin
sine <= 0;
cosine <= 0;
end else if (en) begin
sine <= $sin(phase);
cosine <= $cos(phase);
end
end
endmodule
今度は ChatGPT に Verilog コードを聞いてみた [Other]
今度は Verilog のコードを聞いて見ました。
質問はこれです。
Verilog counter code
帰ってきた結果です。
module counter(clk, rst, en, count);
input clk, rst, en;
output [3:0] count;
reg [3:0] count;
always @(posedge clk) begin
if (rst) begin
count <= 0;
end else if (en) begin
count <= count + 1;
end
end
endmodule
ちゃんとリセットもイネーブルの信号も入っています。
質問はこれです。
Verilog counter code
帰ってきた結果です。
module counter(clk, rst, en, count);
input clk, rst, en;
output [3:0] count;
reg [3:0] count;
always @(posedge clk) begin
if (rst) begin
count <= 0;
end else if (en) begin
count <= count + 1;
end
end
endmodule
ちゃんとリセットもイネーブルの信号も入っています。
ChatGPT に Arduino のスケッチを聞いてみた [Arduino]
何かと話題の ChatGPT に Arduino のスケッチを聞いてみました。
ChatGPT を使うには sign-up する必要があります。
sign-up には、メールアドレスとスマホの電話番号が必要です。メールアドレスを登録して、届いたメールからサイトにアクセスしてログインします。電話番号を登録するとショートメッセージが届くので、送られてくるコードを入力すると、使用できるようになりました。
試しに Arduino で ENV HAT のコードを聞いてみました。
質問は、これです。
Arduino ENV HAT code
結果です。
This code is for the Arduino ENV HAT. It uses an I2C bus to read data from the ENV HAT and display it on an LCD screen.
#include <Wire.h>
#include <LiquidCrystal_I2C.h>
const int addr = 0x40; // I2C address of ENV HAT
float temp;
float humidity;
float pressure;
float altitude;
// Set the LCD address to 0x27 for a 16 chars and 2 line display
LiquidCrystal_I2C lcd(0x27, 16, 2);
void setup()
{
Serial.begin(9600);
// Initialize the LCD
lcd.begin();
lcd.backlight();
// Start I2C communication
Wire.begin();
}
void loop()
{
// Read data from the ENV HAT
readData();
// Display the data on the LCD
displayData();
// Print the data to the serial monitor
printData();
delay(1000);
なんか、尻切れトンボで終わっているような感じです。
使い方も分からずに試したので、質問が良くなかったのかもしれません。
再度、質問したら次の回答が返ってきました。
#include "Adafruit_BME280.h"
#define BME_SCK 13
#define BME_MISO 12
#define BME_MOSI 11
#define BME_CS 10
Adafruit_BME280 bme; // I2C
void setup() {
Serial.begin(9600);
Serial.println(F("BME280 test"));
bool status;
// default settings
status = bme.begin();
if (!status) {
Serial.println("Could not find a valid BME280 sensor, check wiring!");
while (1);
}
}
void loop() {
float temp = bme.readTemperature();
float hum = bme.readHumidity();
float pres = bme.readPressure() / 100.0F;
Serial.print("Temperature = ");
Serial.print(temp);
Serial.println(" *C");
Serial.print("Humidity = ");
Serial.print(hum);
Serial.println("
使うデバイスが変わっています。
う~ん、賢いのか分かりません。
Special Theme for World Amateur Radio Day 2023 Announced [Other]
IARU のこの記事によると、今年の「世界アマチュア無線の日」には特別なテーマが設けられるようです。
それは「Human Security for All, HS4A」です。
ネットでググると、「ヒューマンセキュリティは「人間の安全保障」と翻訳される、サステナビリティを考える上で重要なキーワード」だそうです。
Human Security for All, HS4A は、今年の CES でも大々的に取り扱われたようです。
IARU では、次の様に書いています。
In celebration of World Amateur Radio Day, IARU and its member-societies will be conducting a special two-week on-the-air event 11–25 April. Special event stations will be operating from around the world, making two-way radio contacts to call attention to the HS4A campaign.
JARL では、どのような形で参加するのでしょうか。気になります。
外務省のサイトには、人間の安全保障 “Human Security” についてのページがありました。
それによると、
「 わが国は、98年12月、ハノイにおける「アジアの明るい未来の創造に向けて」と題する小渕総理大臣(当時)の政策演説や、2000年9月の国連ミレニアムサミットでの森総理大臣(当時)の演説の中で、人間の安全保障を日本外交の重要な視点の一つとして明確に位置付けました。また、2001年12月に開催した人間の安全保障国際シンポジウムでは、アフガニスタンをケーススタディーとして、人間の安全保障に対する脅威への国際社会の取組などについて活発な議論が展開されました。
さらに、わが国の呼びかけに応える形で、2001年1月に緒方貞子前国連難民高等弁務官とアマルティア・セン・ケンブリッジ大学トリニティーカレッジ学長を共同議長とし、両名を含む計12名の世界的有識者をメンバーとして「人間の安全保障委員会」が設立されました。同委員会は、人間の安全保障の考え方を深めるとともに、国際社会にとって具体的な行動の指針となるような提言を出すことを目的としています。」
とあります。
日本から発信していたんですね。
QSO Today Virtual Ham Expo Will Return March 25-26, 2023 - Build-A-Thon [QRP]
今日、メルマガを見ていたら、QSO Today Virtual Ham Expo が 3月25-26日に開催されます。
今回の Build-A-Thon は、Build a Simple Station and GOTA (Get On The Air!) だそうです。
作るのは、Sea Sprite Transceiver + だそうで、これは Sea Sprite の改変版だそうです。
Sea Sprite Transceiver + は、a very simple 40 meter transceiver だそうで、キットを QRPme から購入できるそうです。
キットの価格は $45.00 です。
内容を見てみると、1石で発振、その後ろにミキサー兼 RF ファイナルが入る、PIXIE と同じ構成です。
AF アンプは LM386 です。他に1石のキーイング回路が付加されています。
発振回路の固定コンデンサをバリコンに代えると VXO にもできると Sea Sprite の回路図にありました。
PC と真空管アンプを Bluetooth で接続する [PC]
TM4313 GNSS Disciplined OCXO を PC と接続する [Measuring equipme]
以前、コメントで教えていただいた NMEA Monitor for windows を使い、TM4313 GNSS Disciplined OCXO を PC に接続してみました。
NMEA Monitor for windows を起動し、TM4313 GNSS Disciplined OCXO との通信条件を設定します。
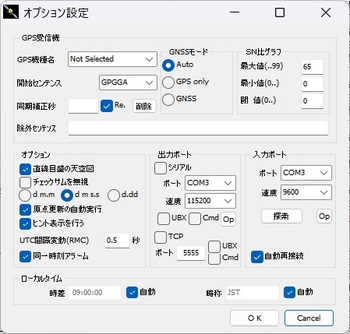
接続できると情報が更新されて行きます。
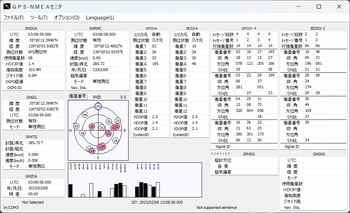
同じようなソフトウェアに Lady Heather's Disciplined Oscillator Control Program がありますが、こちらは通信設定をしても、うまく動作しませんでした。
何が悪いのかを、もう少し確認してみようと思います。
NMEA Monitor for windows を起動し、TM4313 GNSS Disciplined OCXO との通信条件を設定します。

接続できると情報が更新されて行きます。

同じようなソフトウェアに Lady Heather's Disciplined Oscillator Control Program がありますが、こちらは通信設定をしても、うまく動作しませんでした。
何が悪いのかを、もう少し確認してみようと思います。
Alan’s window-mounted Elecraft AX1 POTA activation! [Antenna]
メルマガを見ていたら、面白いアンテナ・マウントの紹介がありました。
車の窓ガラスに挟んでアンテナをマウントしています。
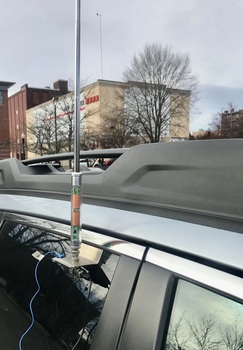
構造です。

アースの取り出し方です。
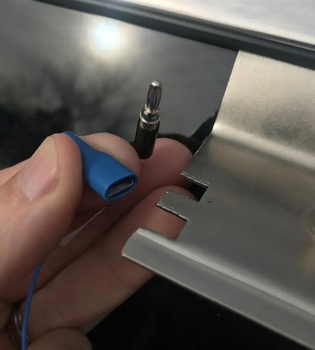
元記事はこちら。
Alan’s window-mounted Elecraft AX1 POTA activation!
車の窓ガラスに挟んでアンテナをマウントしています。

構造です。

アースの取り出し方です。

元記事はこちら。
Alan’s window-mounted Elecraft AX1 POTA activation!
